阿里云Kubernetes实战1--集群搭建与服务暴露
前言:
考虑到公司持续集成与docker容器技术实施已有一段时间,取得了不错的效果,但对于设备运维、系统隔离、设备利用率和扩展性还有待提升,综合目前比较成熟的微服务技术,打算把现有业务迁移到K8S集群。
由于公司所有业务均部署在阿里云上,最开始就调研了阿里云自己提供的Kubernetes集群,但后来还是放弃了,主要考虑几方面:
- 阿里云K8S集群尚不成熟,使用的版本也相对较老,不能及时更新版本
- 阿里云K8S集群目前只支持多主多从结构,同时限定Master节点只能是3个,不能增减,这对于小型业务或者巨型业务均不适用
- 自建原生K8S集群更有利于拓展和理解整体结构
接下来会详细介绍在阿里云搭建原生Kubernetes集群的过程。
一、K8S集群搭建
下面的实战操作基于阿里云的VPC网络,在4台ECS上搭建K8S单主多从集群,部署Gitlab,Gitlab的数据存储在阿里云NAS上,服务通过SLB暴露至外网
- 阿里云VPC * 1
- EIP * 2
- NAT网关 * 1
- 共享流量包 * 1
- 阿里云ECS(无外网IP) * 4
- 阿里云SLB * 4
- 阿里云NAS * 1
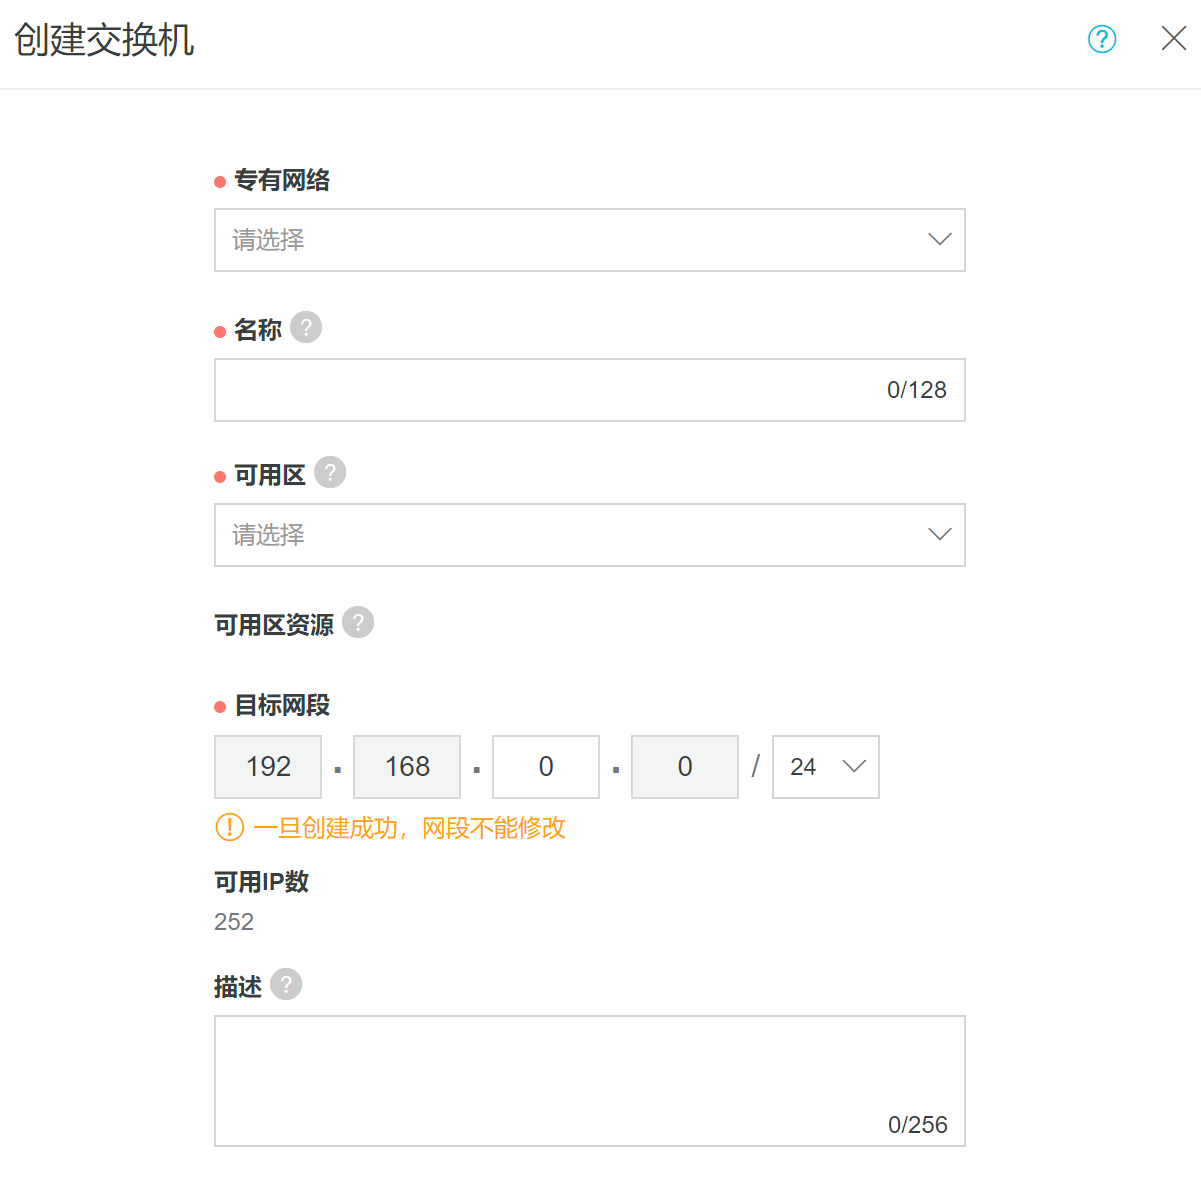
1.1 VPC组网
对于VPC,新建交换机,目标网段用192.168.0.0/24,4台ECS的内网IP分别设置为192.168.0.1 ~ 192.168.0.4
1.2 NAT网关与EIP打通网络
由于VPC网络内,所有的ECS没有配置外网IP,所以这里要配置NAT网关和弹性IP来打通外网和VPC的通讯。
开通一个NAT网关,并加入到VPC内
开通两个EIP,一个用于DNAT(VPC访问外网),另一个用于SNAT(外网访问EIP)
绑定EIP到NAT网关

配置DNAT(外网访问VPC)
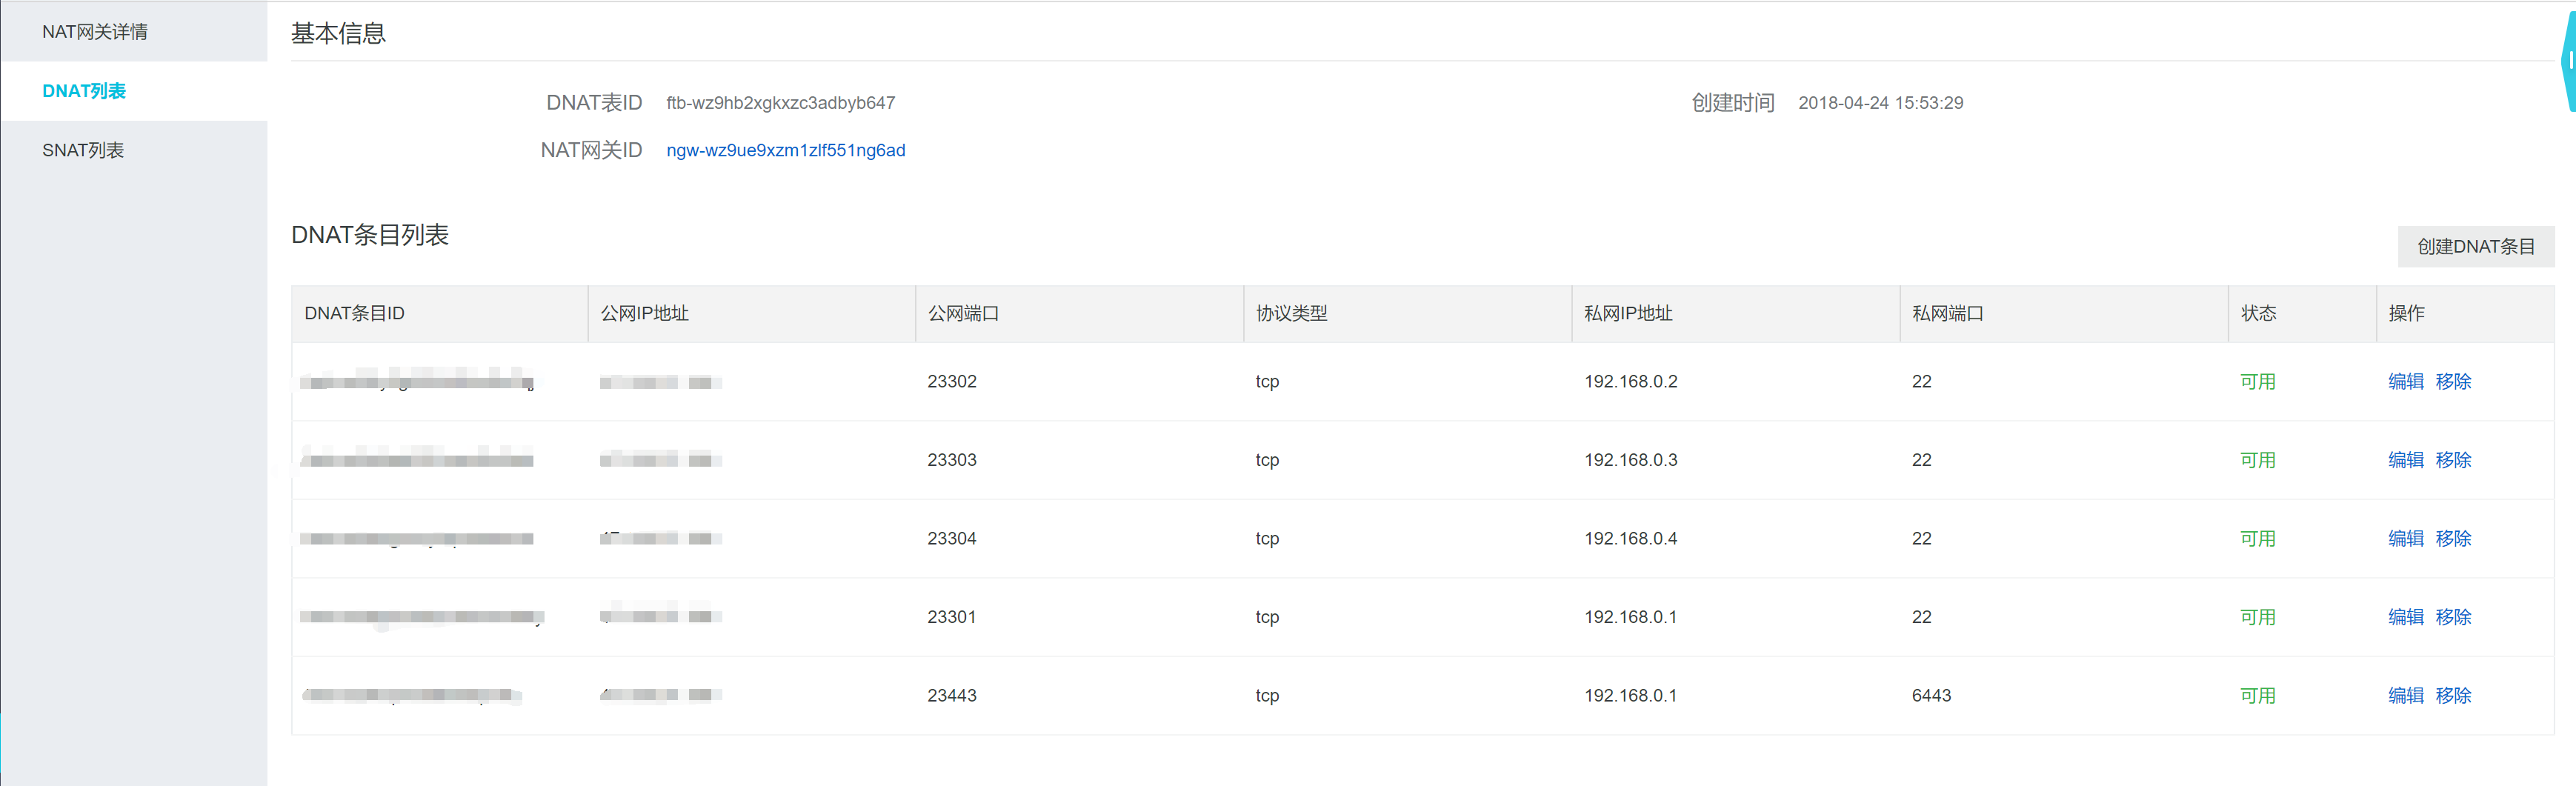
- 我们有4台ECS,每台机器的22端口分别映射到EIP的不同端口上,如23301~23304,该端口用于SSH访问ECS
- 同时映射192.168.0.1的6443端口到EIP上,如映射至23443端口,该端口用于访问K8S集群的API,见第二章内容
配置SNAT(VPC访问外网)
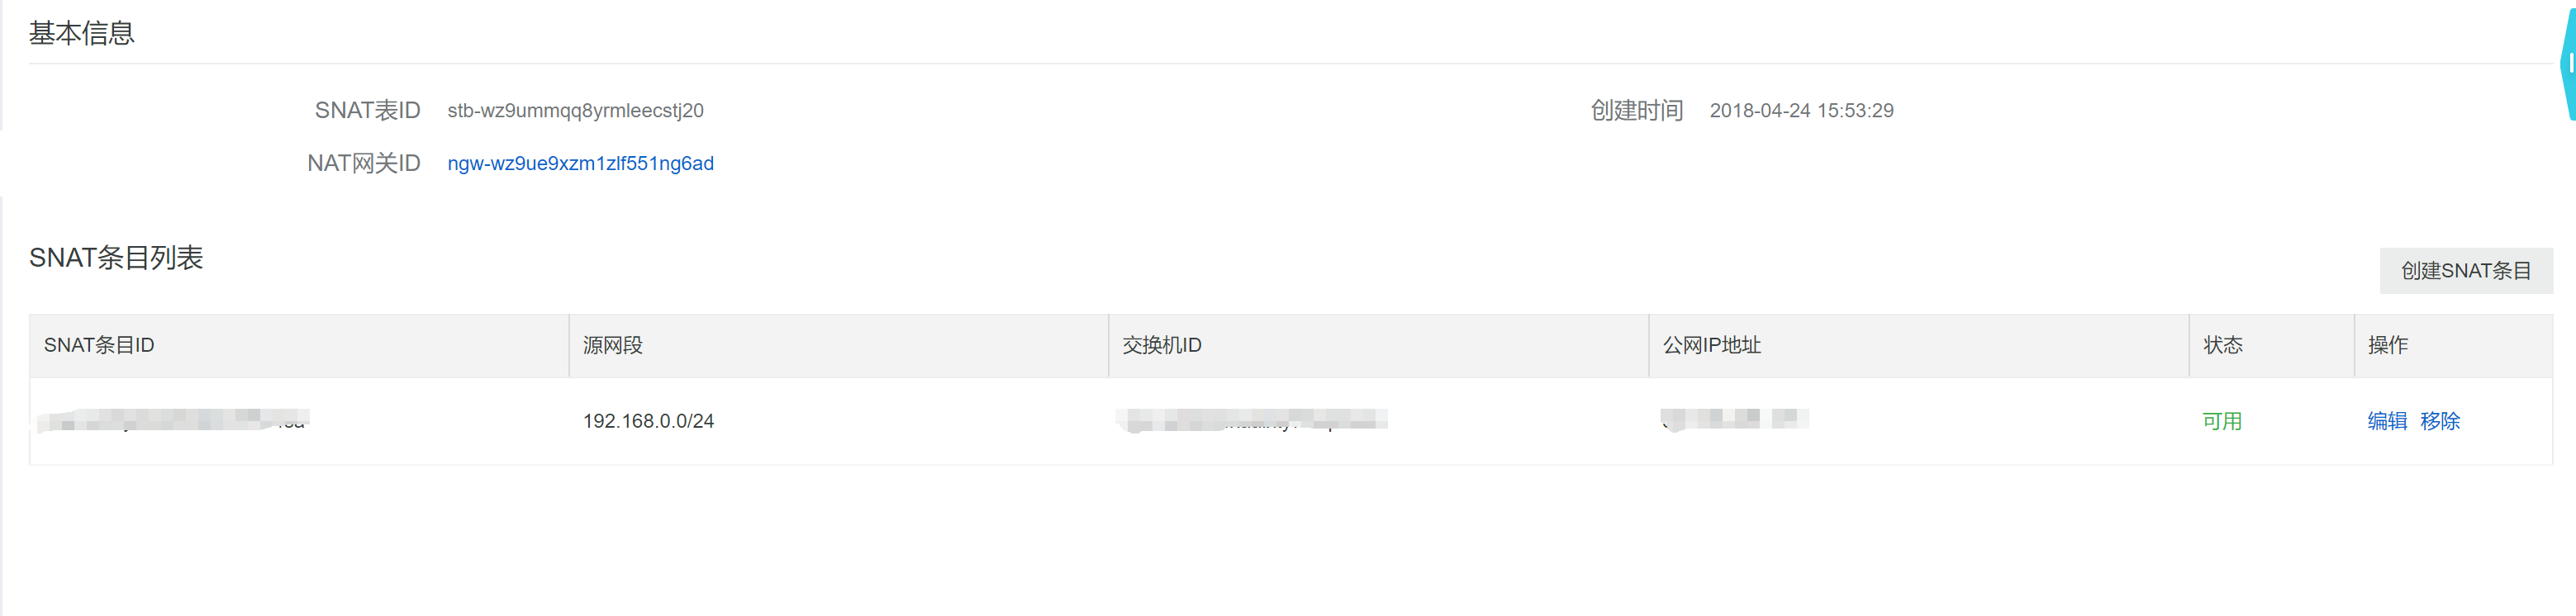
配置完成后,便可以使用绑定DNAT的EIP的映射端口通过SSH访问ECS
1.3 使用Kubeasz部署K8S集群
搭建K8S集群相对比较简单,使用kubeasz的AllinOne部署即可
- 修改hosts文件,根据实际环境配置master、node、etc的ip
- 这里将192.168.0.1设置为master,使用单主多从的方式
- 配置完成后重启所有ECS
二、部署Gitlab实战
2.1 K8S Dashboard
部署好集群后,我们可以使用DNAT的EIP,通过映射端口23443访问K8S API和Dashboard
https://EIP:Port/api/v1/namespaces/kube-system/services/https:kubernetes-dashboard:/proxy
进入后会要求输入API的账号密码,与1.3章节hosts文件里配置的账号密码一致
通过账号密码验证后可看到K8S Dashboard登录界面
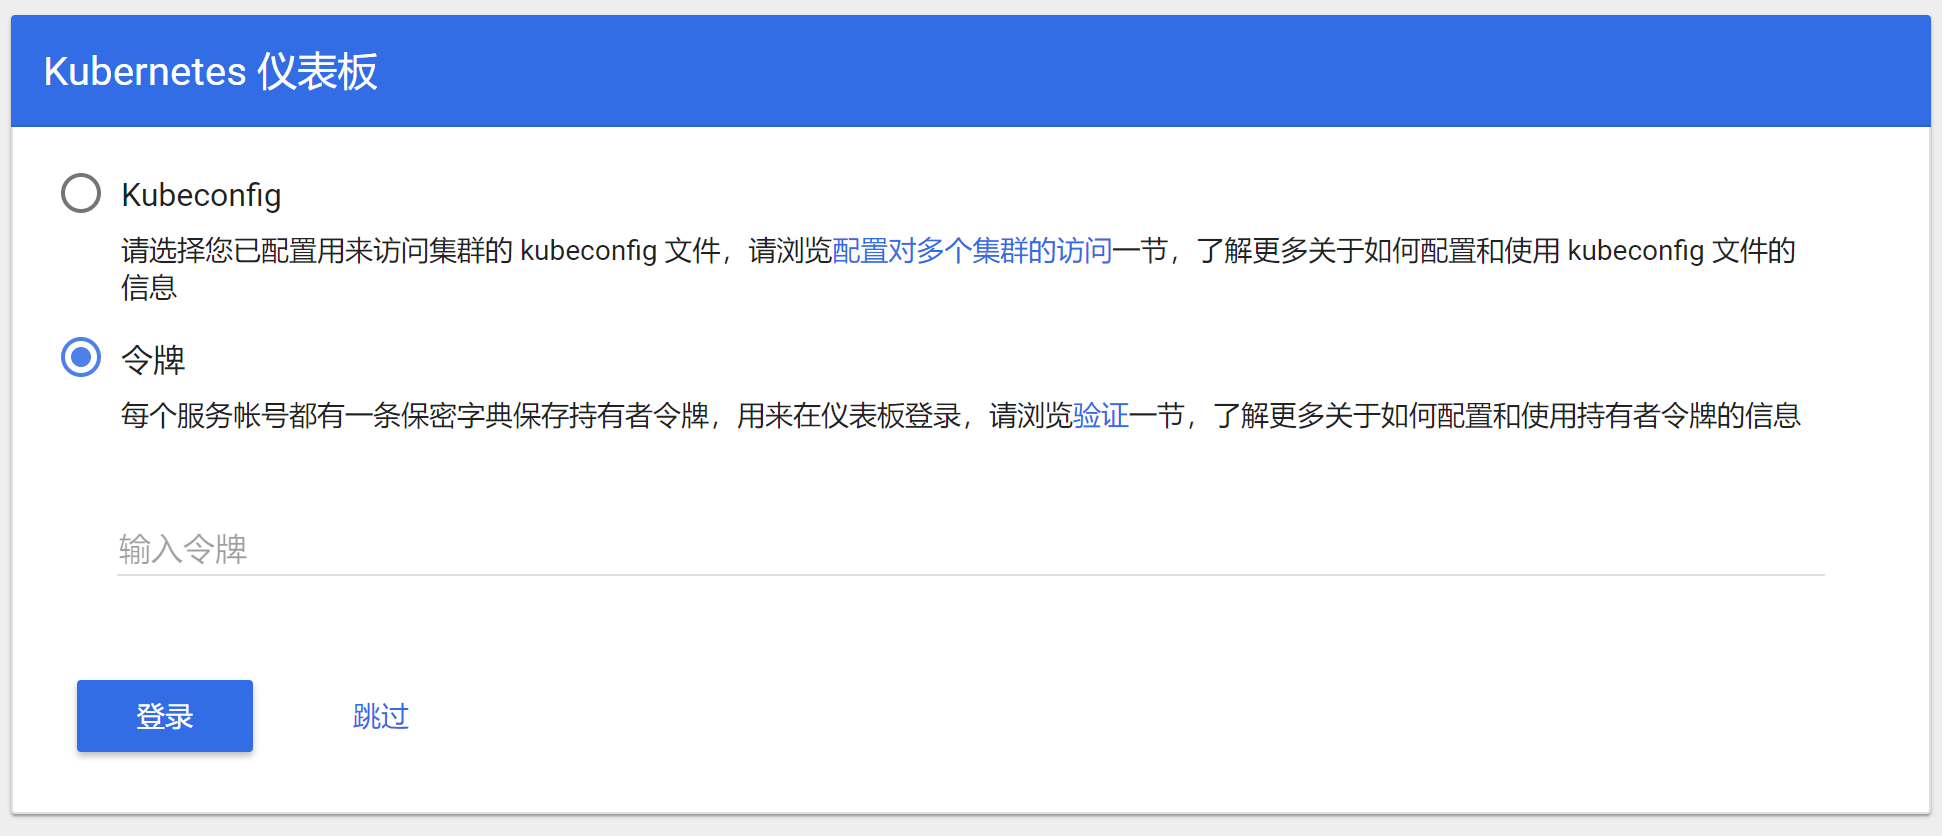
令牌可在Master节点通过以下命令获取
kubectl -n kube-system describe secret $(kubectl -n kube-system get secret | grep admin-user | awk '{print $1}')
2.2 PV与PVC
K8S中的PV和PVC的概念这里不再多提,引用官方的一段解释:
A PersistentVolume (PV) is a piece of storage in the cluster that has been provisioned by an administrator. It is a resource in the cluster just like a node is a cluster resource. PVs are volume plugins like Volumes, but have a lifecycle independent of any individual pod that uses the PV. This API object captures the details of the implementation of the storage, be that NFS, iSCSI, or a cloud-provider-specific storage system.
A PersistentVolumeClaim (PVC) is a request for storage by a user. It is similar to a pod. Pods consume node resources and PVCs consume PV resources. Pods can request specific levels of resources (CPU and Memory). Claims can request specific size and access modes (e.g., can be mounted once read/write or many times read-only).
在Gitlab for Docker中,我们看到Volumes 有三个,如下表所示
| Local location | Container location | Usage |
|---|---|---|
/srv/gitlab/data |
/var/opt/gitlab |
For storing application data |
/srv/gitlab/logs |
/var/log/gitlab |
For storing logs |
/srv/gitlab/config |
/etc/gitlab |
For storing the GitLab configuration files |
所以我们也需要给Gitlab for K8S分配3个PV和PVC,这里我们用到了阿里云NAS
给NAS添加挂载点,选择VPC网络和VPC的交换机
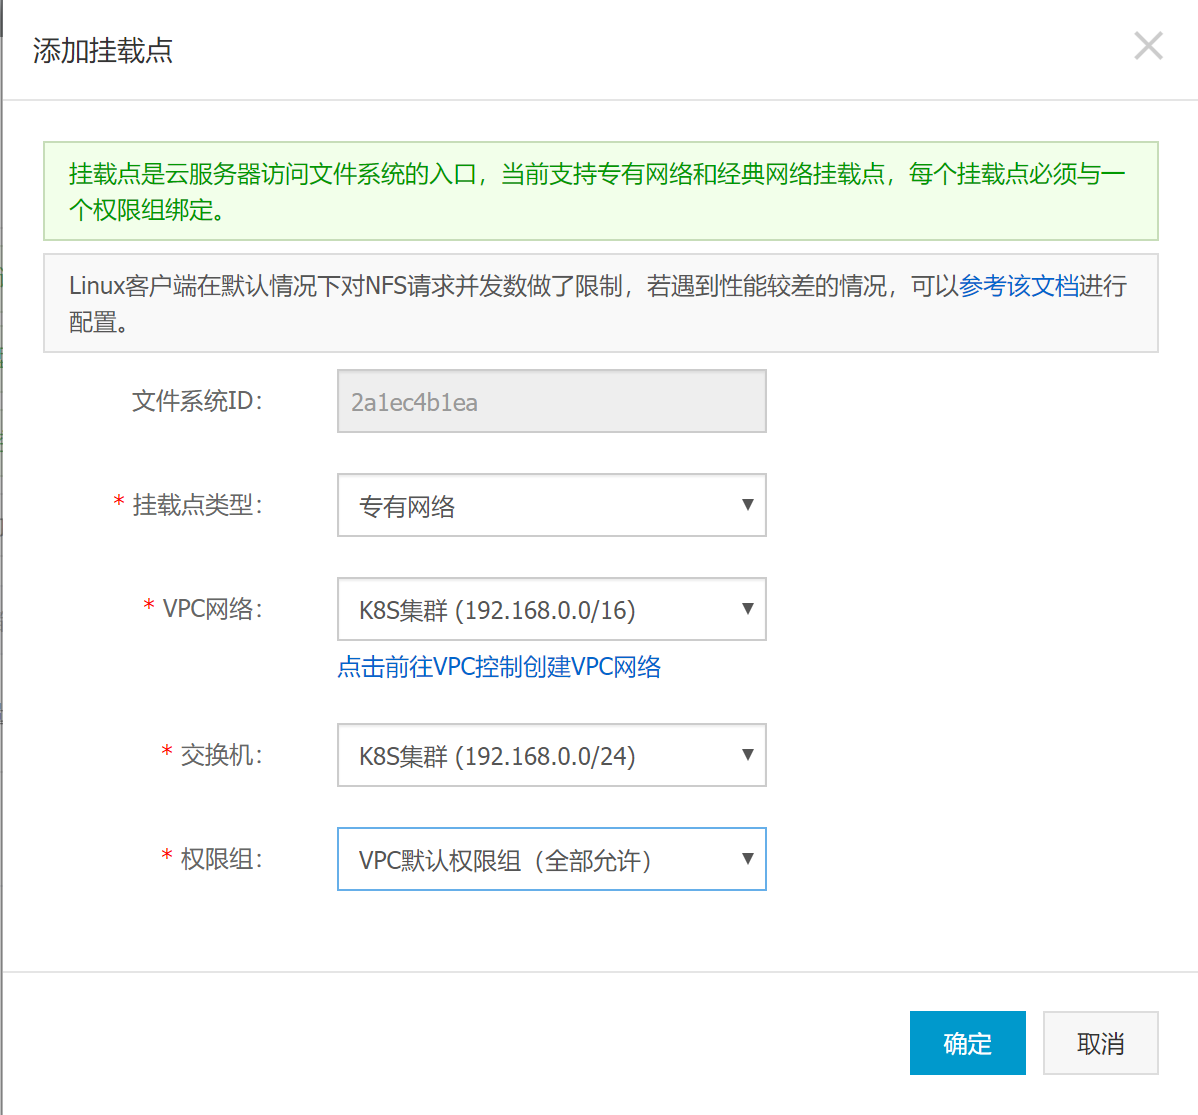
查看挂载地址

SSH登录Master节点,挂载NAS,并创建文件夹(注意PV的path必须已存在才可以成功建立,所以需要先在NAS中创建文件夹)
1
2
3
4
5
mkdir /nas
sudo mount -t nfs -o vers=4.0 xxx.xxx.nas.aliyuncs.com:/ /nas
mkdir -p /gitlab/data
mkdir -p /gitlab/logs
mkdir -p /gitlab/config编写PV和PVC的YAML,根据实际需求替换server节点的NAS挂载地址配置以及storage大小配置
1
2
3
4
5
6
7
8
9
10
11
12
13
14
15
16
17
18
19
20
21
22
23
24
25
26
27
28
29
30
31
32
33
34
35
36
37
38
39
40
41
42
43
44
45
46
47
48
49
50
51
52
53
54
55
56
57
58
59
60
61
62
63
64
65
66
67
68
69
70
71
72
73
74
75
76
77
78
79
80
81
82
83
84
85
86
87
88
89
90
91
92
93
94
95
96
97
98
99
100
101
102
apiVersion: v1
kind: Namespace
metadata:
name: gitlab
labels:
name: gitlab
apiVersion: v1
kind: PersistentVolume
metadata:
name: gitlab-data
labels:
release: gitlab-data
namespace: gitlab
spec:
capacity:
storage: 500Gi
accessModes:
- ReadWriteMany
persistentVolumeReclaimPolicy: Retain
nfs:
path: /gitlab/data
server: xxx.xxx.nas.aliyuncs.com
apiVersion: v1
kind: PersistentVolume
metadata:
name: gitlab-config
labels:
release: gitlab-config
namespace: gitlab
spec:
capacity:
storage: 1Gi
accessModes:
- ReadWriteMany
persistentVolumeReclaimPolicy: Retain
nfs:
path: /gitlab/config
server: xxx.xxx.nas.aliyuncs.com
apiVersion: v1
kind: PersistentVolume
metadata:
name: gitlab-log
labels:
release: gitlab-log
namespace: gitlab
spec:
capacity:
storage: 1Gi
accessModes:
- ReadWriteMany
persistentVolumeReclaimPolicy: Retain
nfs:
path: /gitlab/log
server: xxx.xxx.nas.aliyuncs.com
apiVersion: v1
kind: PersistentVolumeClaim
metadata:
name: gitlab-data-claim
namespace: gitlab
spec:
accessModes:
- ReadWriteMany
resources:
requests:
storage: 500Gi
selector:
matchLabels:
release: gitlab-data
apiVersion: v1
kind: PersistentVolumeClaim
metadata:
name: gitlab-config-claim
namespace: gitlab
spec:
accessModes:
- ReadWriteMany
resources:
requests:
storage: 1Gi
selector:
matchLabels:
release: gitlab-config
apiVersion: v1
kind: PersistentVolumeClaim
metadata:
name: gitlab-log-claim
namespace: gitlab
spec:
accessModes:
- ReadWriteMany
resources:
requests:
storage: 1Gi
selector:
matchLabels:
release: gitlab-log
2.3 K8S部署Gitlab
接下来补全Gitlab的Deployment和Service
1 | apiVersion: apps/v1 |
注意在Deployment中,开放了Gitlab Pod的80、443和22端口,用于Gitlab的HTTP、HTTPS和SSH的访问
创建了2个Service,第一个只将80和443端口开放到Cluster IP上,第二个Service通过NodePort将22端口映射到NodeIp的30000端口上
我们将2.2章节PV与PVC中的相关代码和上面的代码合并,并命名成gitlab.yaml,上传到Master节点,执行命令
1
kubectl apply -f gitlab.yaml
接下来进入Gitlab的Pod,修改gitlab的域名,并启用https访问
1
2
3
4
5
6
7
8
kubectl get pod --namespace=gitlab
获得gitlab pod名称后
kubectl exec -it gitlab-xxxx-xxxx --namespace=gitlab /bin/bash
进入pod后
vi /etc/gitlab/gitlab.rb
修改external_url 'https://xxx.xxx.com',保存后退出
gitlab-ctl reconfigure
exit
到这里,配置与部署基本完成了,但我们还不能从外网访问Gitlab,不过至少可以在集群内验证配置是否正确。
在Master节点查看Service
1
kubectl get svc --namespace=gitlab

可以看到443和80端口已经开发给Cluster IP,同时22端口映射到了30000的NodePort上
通过curl命令查看访问结果
1
curl https://10.68.88.97 --insecure
这时返回一串包含redirect的字符,如下
<html><body>You are being <a href="https://10.68.88.97/users/sign_in">redirected</a>.</body></html>表示服务已部署成功
如果有telnet客户端,还可以验证30000端口,在任何一个节点上执行任意一条命令
1
2
3
4
telnet 192.168.0.1:30000
telnet 192.168.0.2:30000
telnet 192.168.0.3:30000
telnet 192.168.0.4:30000
2.4 使用Ingress-Nginx和阿里云SLB暴露服务
K8S暴露服务的方法有3种:
- ClusterIP:集群内可访问,但外部不可访问
- NodePort:通过NodeIP:NodePort方式可以在集群内访问,结合EIP或者云服务VPC负载均衡也可在集群外访问,但开放NodePort一方面不安全,另一方面随着应用的增多不方便管理
- LoadBalancer:某些云服务提供商会直接提供LoadBalancer模式,将服务对接到负载均衡,其原理是基于kubernetes的controller做二次开发,并集成到K8S集群,使得集群可以与云服务SDK交互
由于我们的集群搭建在阿里云上,所以第一时间想到的是LoadBalancer方案,但很遗憾,没办法使用,原因如下:
- 阿里云自己提供的Kubernetes集群才可以使用LoadBalancer,但我们是自己在阿里云上搭建的,不具备这个功能
- 阿里云也有开源的alicloud-controller-manager,但长期没有更新,同时网上现有的资料都过时很久,版本对应不上
回归到NodePort的方式,目前已有的解决方案是基于Ingress的几款工具,如Ingress-Nginx、Traefik-Ingress,他们的对比如下(注意,目前的版本是IngressNginx 0.13.0、Traefik 1.6):
- IngressNginx和Traefik都是通过hostname方式反向代理已解决端口暴露问题
- IngressNginx依赖于Nginx,功能更多;Traefik不依赖Nginx,所以更轻量
- IngressNginx支持4层和7层LB,但4层也不好用,Traefik只支持7层代理
- 目前网上关于IngressNginx的文章都是beta 0.9.X版本的信息,而IngressNginx在Github的地址也变化了,直接由Kubernetes维护,所以网上的文章基本没参考性,还需看官方文档,但是官方文档极其混乱和不完善!!! 后面会有填坑指南。
最终我们还是选择了Ingress-Nginx,结合阿里云SLB,最终的拓扑图如下所示:
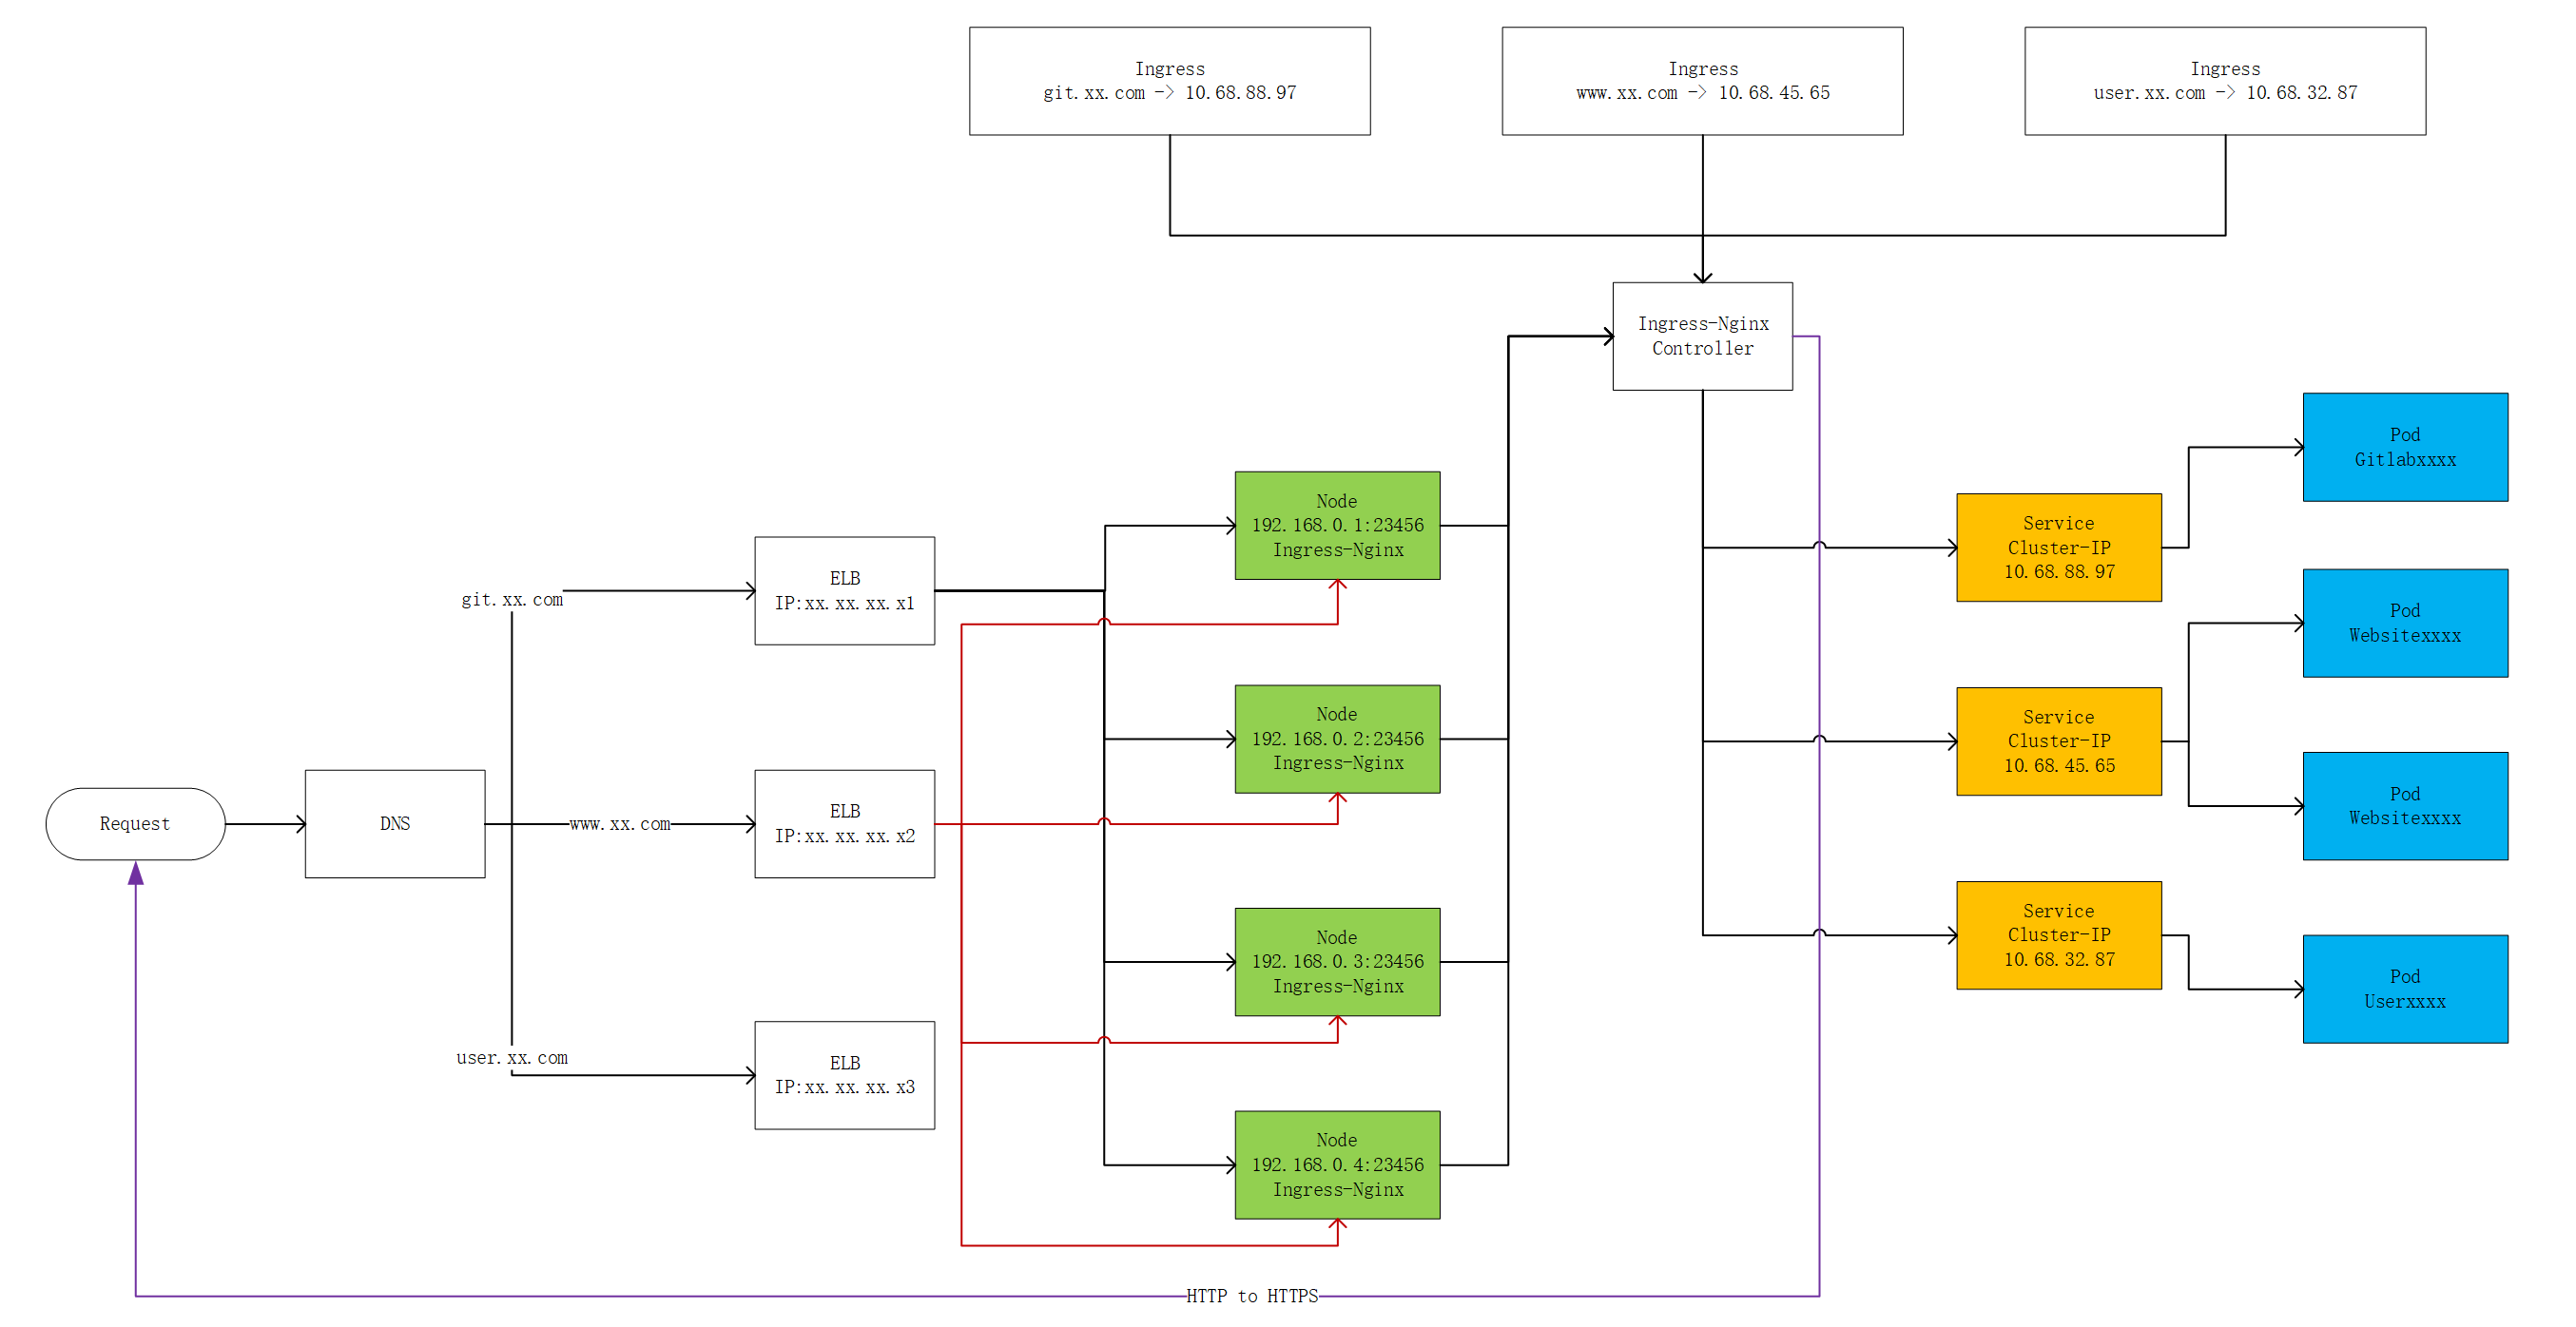
其原理是:
- 通过Service的ClusterIP负载Pod
- 通过Ingress-Nginx监听Ingress配置,动态生成Nginx,并将Nginx暴露到23456的NodePort
- 通过阿里云SLB监听所有节点的23456端口
接下来看详细步骤。
2.4.1 部署Ingress-Nginx
主要参考https://kubernetes.github.io/ingress-nginx/deploy/,并做一些小调整
- 替换gcr.io的镜像为阿里云镜像
- 暴露服务端口到NodePort 23456
- 整合成一个ingress-nginx.yaml
1 | apiVersion: v1 |
上传到Master节点后执行命令:
1 | kubectl apply -f ingress-nginx.yaml |
2.4.2 给gitlab配置ingress
修改2.3章节的gitlab.yaml,添加
1 | apiVersion: extensions/v1beta1 |
重新执行
1 | kubectl apply -f gitlab.yaml |
这里就有几个坑了:
网上很多关于Ingress-Nginx的文章比较老旧,与新版annotations的配置不同,还是要以官方文档为准
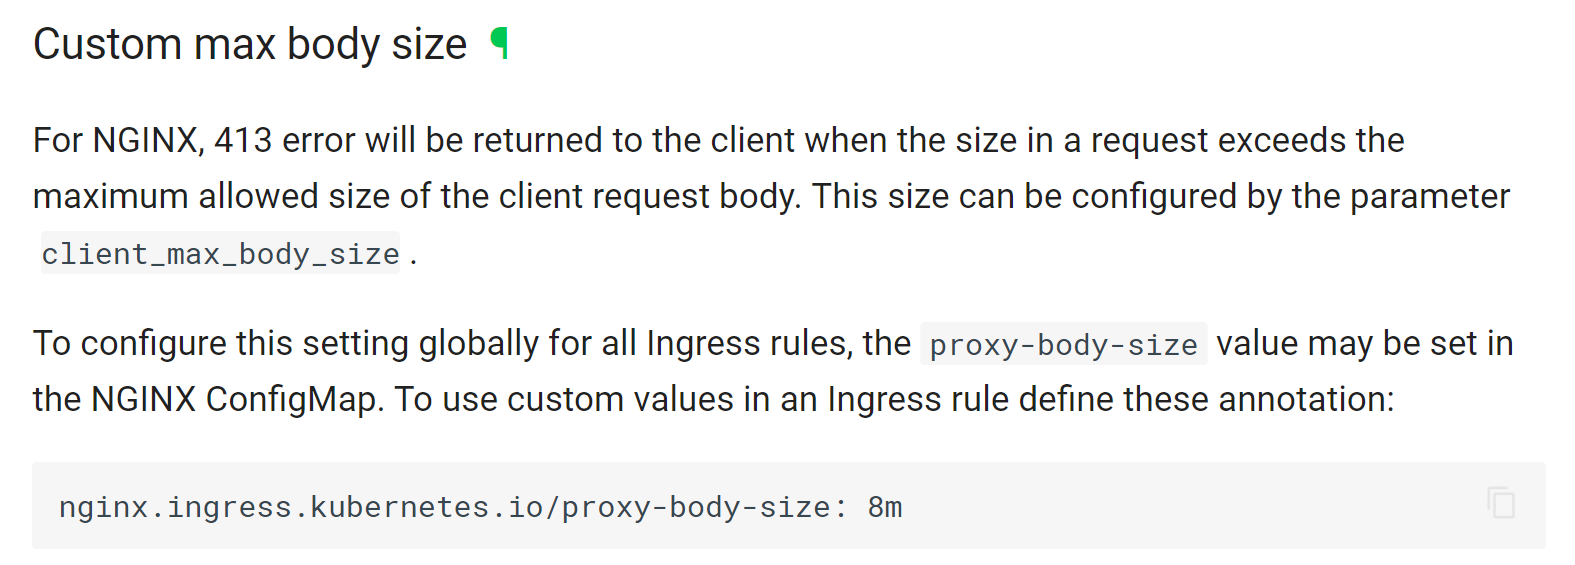
annotations的配置与nginx实际配置的名称不同,不要错填,还是要以文档为准。比如上面例子中,
nginx.ingress.kubernetes.io/proxy-body-size实际上在nginx里是client_max_body_size,不要错填成nginx.ingress.kubernetes.io/client_max_body_size官方文档也有不清楚的地方,比如部分配置没有示例说明,还有的示例错误。比如上面例子中,官方给出的例子是
而事实上,value必须用双引号,否则配置将无效
2.4.3 设置阿里云SLB
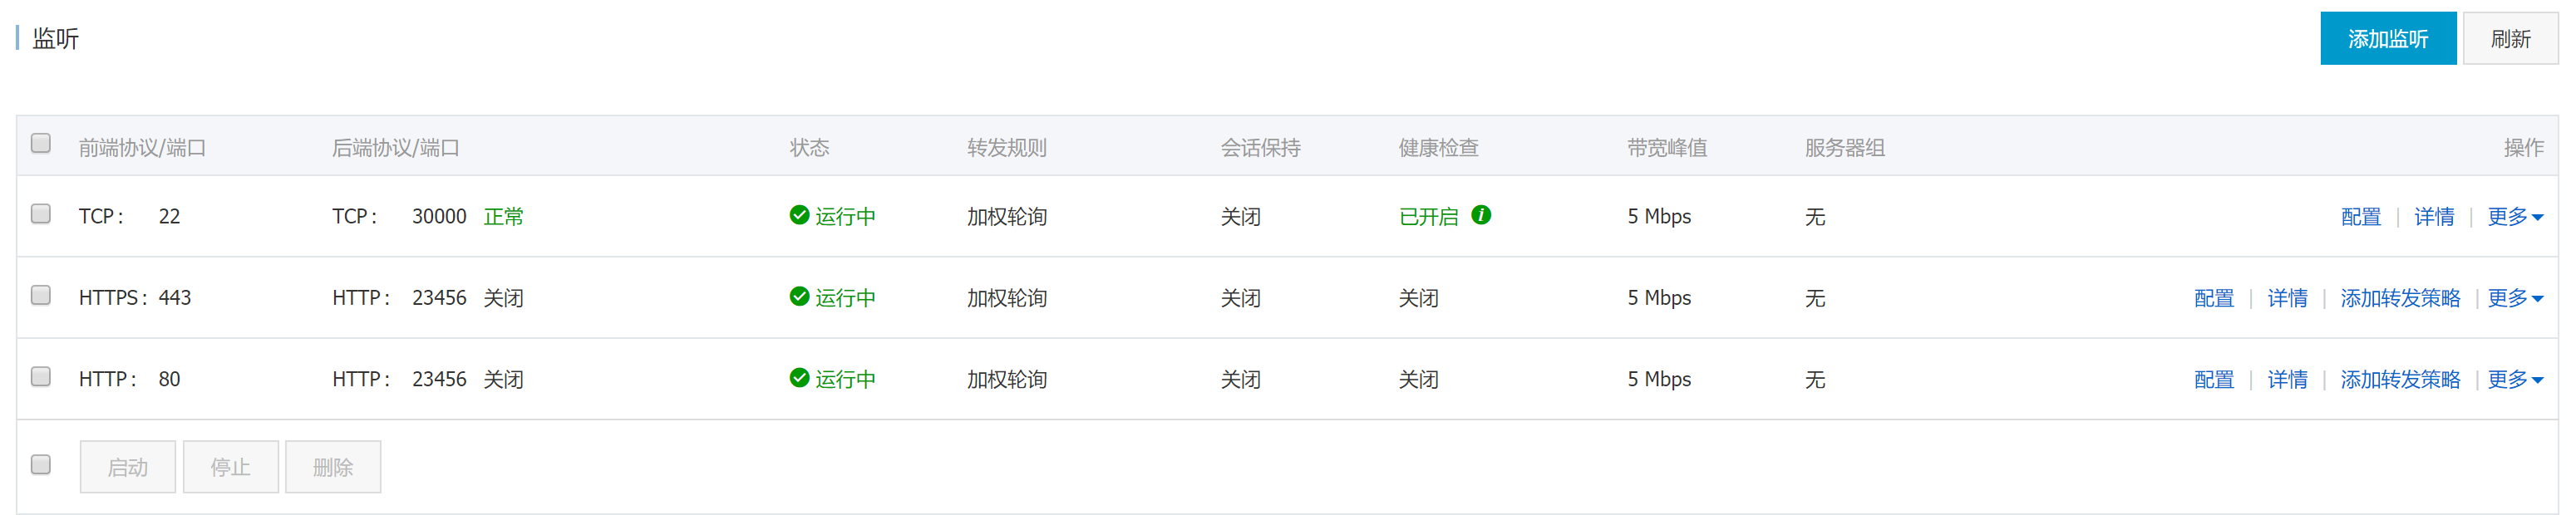
阿里云SLB的设置比较简单
后台服务器添加所有的K8S节点
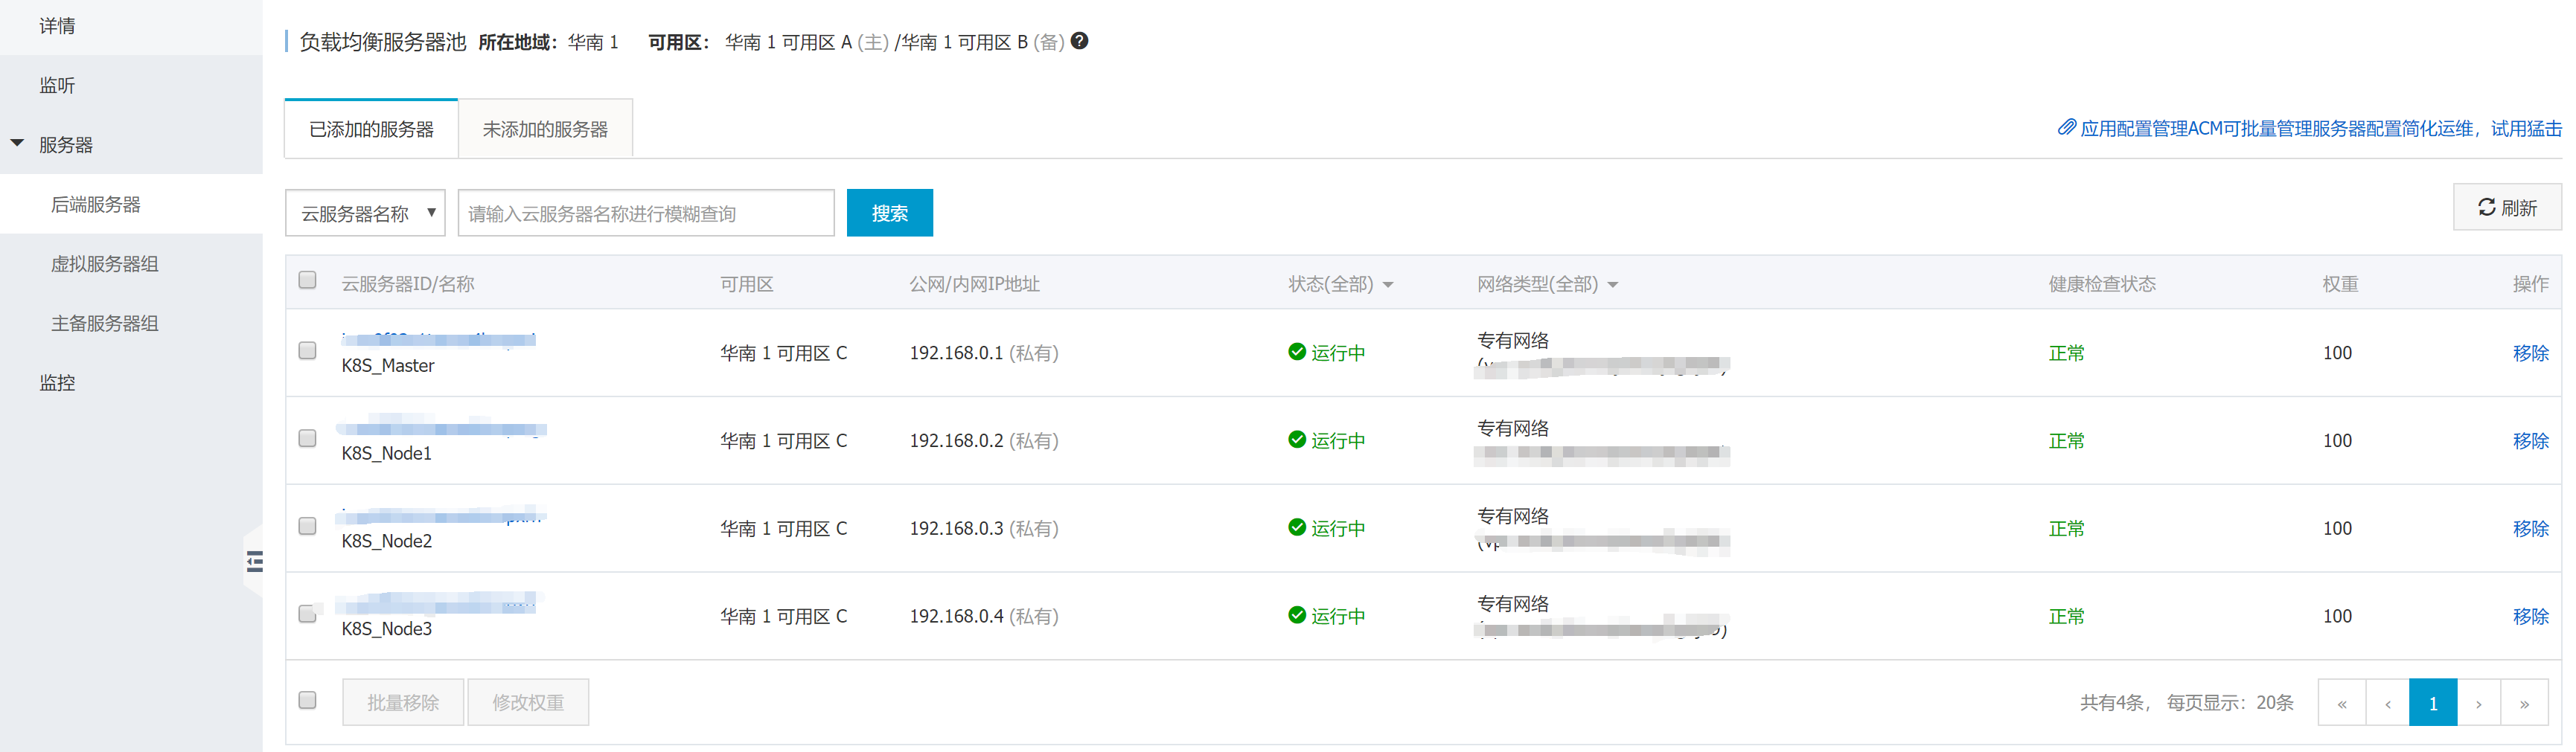
配置监听,HTTP:80 -> 23456 ,HTTPS:443 -> 23456 并配置SSL证书, TCP:22 -> 30000,需要注意的是HTTP和HTTPS监听需要勾选SLB监听协议,以配合2.4.2章节中的
force-ssl-redirect重定向,HTTPS中的SSL将配合ssl-passthrough传递到后台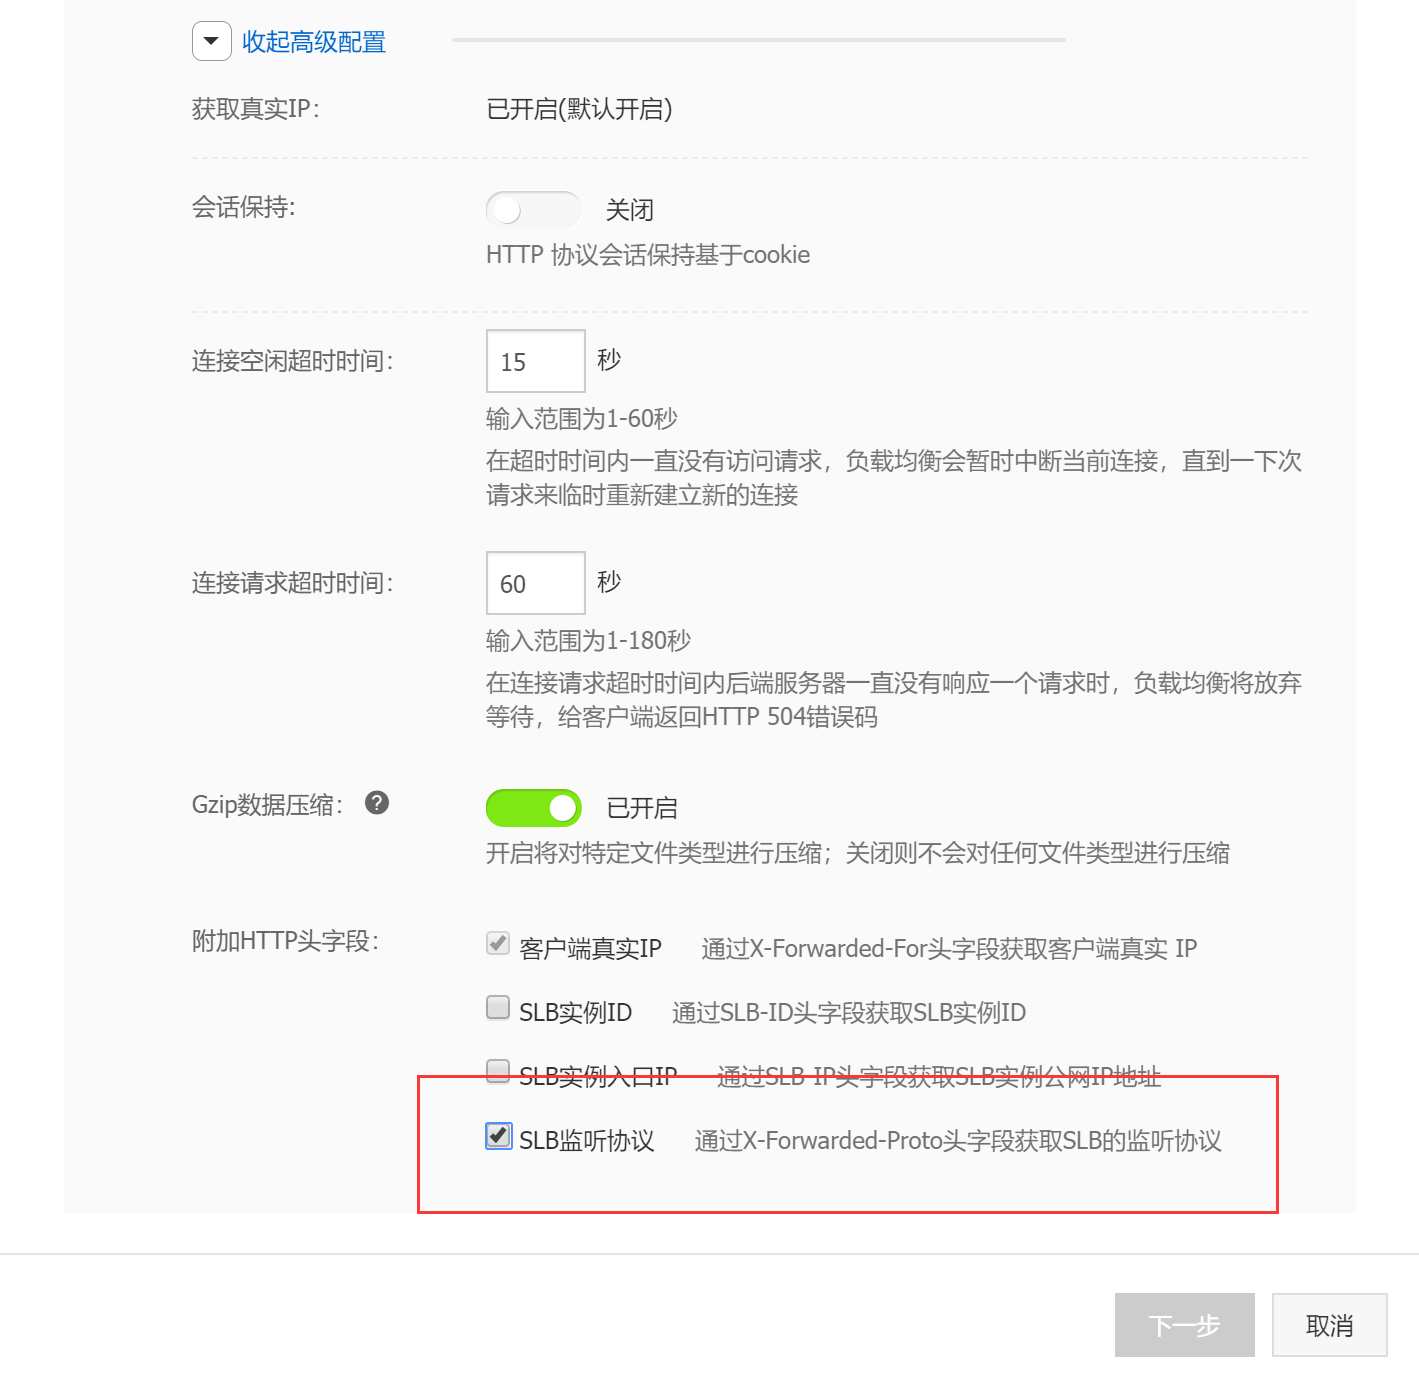
把SLB的公网IP添加到域名解析
至此,所有的配置完成。
阿里云Kubernetes实战1--集群搭建与服务暴露