利用nodejs在webpack打包完成后自动上传文件到阿里云OSS

项目使用Webpack打包,打包完成后生成一些asset,不管是本地开发还是jenkins持续集成,都希望自动上传这些asset到阿里云OSS,于是用nodejs写一个脚本:

1. upload_oss.js

1
2
3
4
5
6
7
8
9
10
11
12
13
14
15
16
17
18
19
20
21
22
23
24
25
26
27
28
29
30
31
32
33
34
35
36
37
38
39
40
41
42
43
44
45
46
47
48
49
50
51
52
53
54
55
56
57
58
59
60
61
62
63
64
65
66
67
68
69
70
71
72
73
74
75
76
77
78
79
80
var co = require('co'); 
var OSS = require('ali-oss') //阿里云oss模块
var fs = require("fs"); //文件模块
var path = require("path");

//---------------------------使用说明----------------------------
//获取命令行传入参数(第0个参数是node 第1个参数是js文件 第2个文件是本地文件夹路径 第3个是oss相对目录)
//命令格式举例: node oss/upload_oss.js ../../static/ /static/

var localPath = process.argv[2]
var remotePath = process.argv[3]
if(localPath == null || remotePath == null){
throw new Error("缺少目录参数!");
return
}

localPath = path.resolve(localPath); //本地目录
remotePath = path.resolve(remotePath); //OSS相对目录

if(!fs.existsSync(localPath)){
throw new Error("本地目录"+ localPath + "不存在!")
return
}


//上传列表
var fileDic = new Array();

//阿里云OSS配置
var client = new OSS({
region: 'oss-cn-shenzhen',
accessKeyId: 'xxxx',
accessKeySecret: 'xxxx',
bucket: 'xxxx'
});


console.log('---------上传OSS---------');
console.log('【Step1】 分析目录');

readDir(localPath)

function readDir(filePath){
filePath = path.resolve(filePath);
//遍历文件目录
var pa = fs.readdirSync(filePath);
pa.forEach(function(filename,index){
var file = path.join(filePath,filename)
var info = fs.statSync(file)
//目录
if(info.isDirectory()){
readDir(file);
}
//文件
else {
//添加到上传列表
var localDir = path.join(filePath,filename);
var remoteDir = path.join(remotePath, localDir.replace(localPath,""));
fileDic[localDir] = remoteDir;
console.log("add file:" + localDir)
}
})
}

console.log('【Step2】 上传文件');

co(function* () {
for(var localDir in fileDic)
{
var result = yield client.put(fileDic[localDir], localDir);
console.log("upload from '" + localDir + "' to '" + fileDic[localDir] + "'");
}
console.log('【Step3】 完成');
}
).catch(function (err) {
throw new Error(err);
}
);

2. package.json调用

1
2
3
4
5
"scripts": {
"dev": "webpack-dev-server --devtool inline-source-map --progress --color --watch-poll",
"test": "export NODE_ENV=test && webpack --progress --color && node oss/upload_oss.js ../test_static/ /demo/test_static/",
"prod": "export NODE_ENV=production && webpack --progress --color && node oss/upload_oss.js ../static/ /demo/static/",
}
阅读更多

Webpack实时刷新与模块热替换(HMR)

1. 背景

公司前端项目从webpack1.X 升级到webpack2.X,加之技术需求和业务需求增长过快,开发人员没有充足时间深入学习webpack相关技术栈,导致很多配置失效、冗余或者无法辨别究竟有什么用途。

此外,我们基于docker-machine封装了vue、webpack、nodejs等前端开发环境到docker image,docker-machine本身基于Virtual Box,这种虚拟机+Docker的方式又挖了一把大坑。详情见:Docker搭建前端开发环境

综上,几种情况导致我们在docker中使用webpack-dev-server,没办法实时刷新,但在本机开发时却可以。

启动命令为:

阅读更多

VS2017安装编码的UI测试(Coded UI Test)

VS2017安装Coded UI Test需满足一个大条件:Visual Studio的版本必须是Enterprise版,只有企业版才能安装Coded UI Test。

安装Coded UI Test,需在VS安装界面,进入“单个组件”,勾选“编码的UI测试”,如下图所示:

然而安装完成后却发现新建项目时找不到“编码的UI测试”项目模板:

解决的方法是在安装VS时,在“语言包”界面中勾选一下“英语”,只勾选安装就好,可以不设置VS成英文:

阅读更多

WPF Image异步加载控件

ImageLoadingControl使用说明

控件提供Source属性,可Binding图片Url或Path

1
2
3
<ImageLoadingControl:ImageLoadingControl HorizontalAlignment="Left" Height="200" Margin="30,68,0,0" VerticalAlignment="Top" Width="200"  Source="{Binding ImageUrl1}"/>
<ImageLoadingControl:ImageLoadingControl HorizontalAlignment="Left" Height="200" Margin="303,68,0,0" VerticalAlignment="Top" Width="200" Source="{Binding ImageUrl2}"/>
<ImageLoadingControl:ImageLoadingControl HorizontalAlignment="Left" Height="200" Margin="556,68,0,0" VerticalAlignment="Top" Width="200" Source="{Binding ImageUrl3}"/>
1
2
3
4
5
6
private void button_Click(object sender, RoutedEventArgs e)
{
ImageUrl1 = @"https://pixabay.com/static/uploads/photo/2016/02/09/13/45/rock-carvings-1189288_960_720.jpg";
ImageUrl2 = @"https://pixabay.com/static/uploads/photo/2016/02/14/14/32/construction-1199586_960_720.jpg";
ImageUrl3 = @"c:\test.jpg";
}

下图分别显示了控件加载中,加载完成,加载失败三种状态:

阅读更多

Hexo Landscape-plus主题分页问题

升级Hexo3.X后发现Landscape-plus主题的分页出现一些问题,由于该主题的GitHub项目也处于长期未维护状态,所以只能自己排查修改。

一、Archive分页问题

进入Archives页面后,发现文章列表没有以标题“方块”展示,而是和主页一样以标题和内容展示:
对于这种情况,需要修改Hexo根目录的_config.yml,加入或修改参数如下所示:

阅读更多

WPF使用BitmapImage内存释放问题

在WPF中进行图片的相关操作是一件比较麻烦的事,并不是说它复杂,而是不注意的话很容易引起内存暴涨甚至溢出。关于BitmapImage使用的相关说明如下:

一、 创建方式

使用Uri设置BitmapImage会自动形成缓存,不关闭整个模块的话GC不会回收。 故如果在单个模块多次显示图片,不要使用这种方式:

var bitmap = new BitmapImage(new Uri(@"c:\test.bmp"));

建议通过流的方式加载图片:

阅读更多

WPF项目转COM组件

最近有一个项目需求,要把WPF开发的程序打包成COM组件供其他程序使用,WPF工程转COM并不困难,但有一些细节还是需要记录一下:

首先需要把应用程序转成类库:
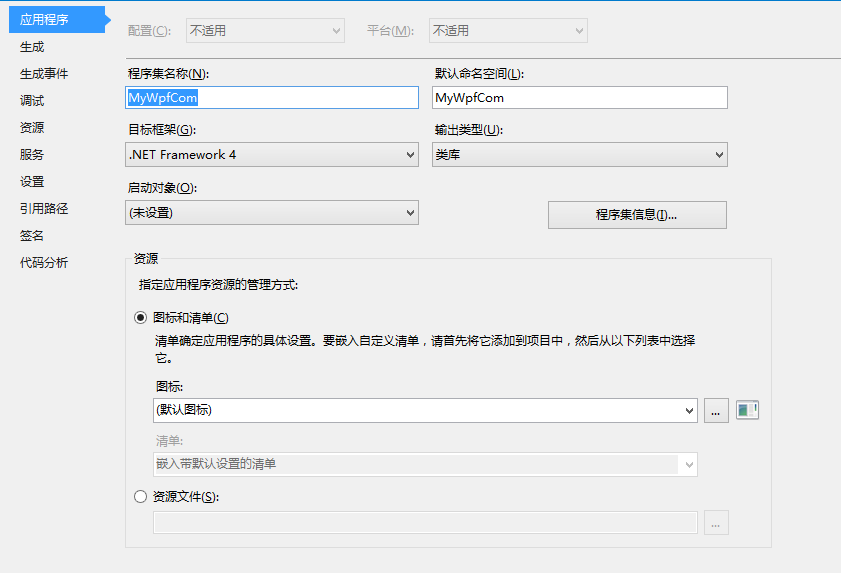
需要注意当应用程序转换成类库后App.xaml就需要删除了,如果在App.xaml中做了启动控制或者全局资源字典,需要重新规划,如全局资源的加载方式,重复启动的判断等等。

还需要注意要把主窗体改成UserControl,否则组件会以窗口形式打开。

阅读更多

LinQtoEntity类型转换

使用EntityFrameWork时,经常会用到lambda表达式来做查询等操作,由于EF要根据表达式生成最终操作数据库的SQL,所以在表达式中加入其它方法如”parse”,”convert”可能会导致不被LinqToEntity识别,异常如下:

System.NotSupportedException: LINQ to Entities does not recognize the method int.Parse(System.String)

但在实际项目中往往会遇到实体字段类型与参数类型需要转换并比较的问题:

问题1: 字段int型与参数string型的比较

例:

阅读更多

Advanced Installer 11.4 使用教程

自从VS2012去掉了自家的Windows Installer改用InstallSheild之后,打包程序总是找不到满意的工具,最后投奔Advanced Installer,界面简洁,操作简单,功能也很强大。

使用Advanced Installer打包程序的常规步骤如下:
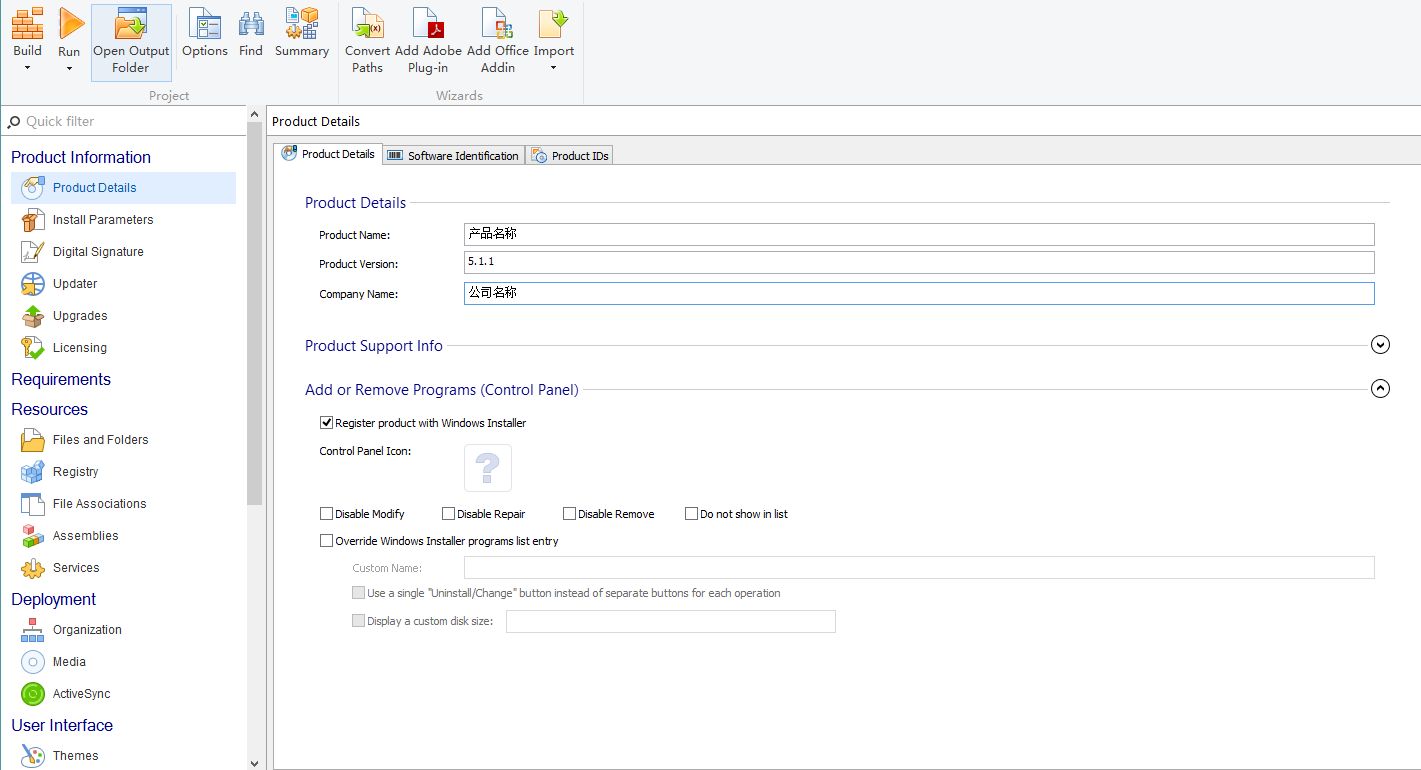
1 产品信息

![](/advanced_ installer/ai1.png)

如图所示,填写Product Name, Product Version 和 Product Company. 这里需要解释一下Product Version与Product Code、Update Code之间的关系:

阅读更多